Automated Cloud Compute Deployment
As a high compute workflow orchestration tool, Covalent provides access to cloud environments with just a few lines of Python code. Two distinct options within the Covalent ecosystem cater to a range of user preferences and technical expertise:
- Complete Cloud Abstraction: Run workflows effortlessly using Covalent Cloud, a fully managed service that handles all the complexities of infrastructure management to provide a totally seamless user experience.
- Open Source Flexibility: Run workflows using the open-source version of Covalent, together with your own cloud infrastructure and access credentials.
Covalent Cloud, the easier option, requires no manual setup for any infrastructure whatsoever. It uses generic cloud executors, so users specify only the required resources—i.e. CPUs, GPUs, memory, etc—without worrying about any cloud services.
Open-source Covalent, on the other hand, relies on modular executor plugins. Most of these plugins are platform-specific and may therefore require some initial setup. We provide extensive documentation for users who interested in fine-tuning cloud settings. Those who prefer not to engage directly with cloud consoles or Infrastructure as Code tools will find covalent deploy to be an ideal solution. In the following sections, we’ll see how this built-in tool lets us create all the infrastructure that Covalent needs for various major cloud platforms.
Covalent’s Deployment Interface
Covalent streamlines cloud compute deployment with a user-friendly CLI. Here, we briefly walk through the basics of this deployment process.
Note
Examples using three major cloud providers, AWS, Google Cloud Platform (a.k.a. GCP), and Microsoft Azure, are included in subsequent sections below.
To follow along, ensure that covalent is installed.
pip install --upgrade covalent
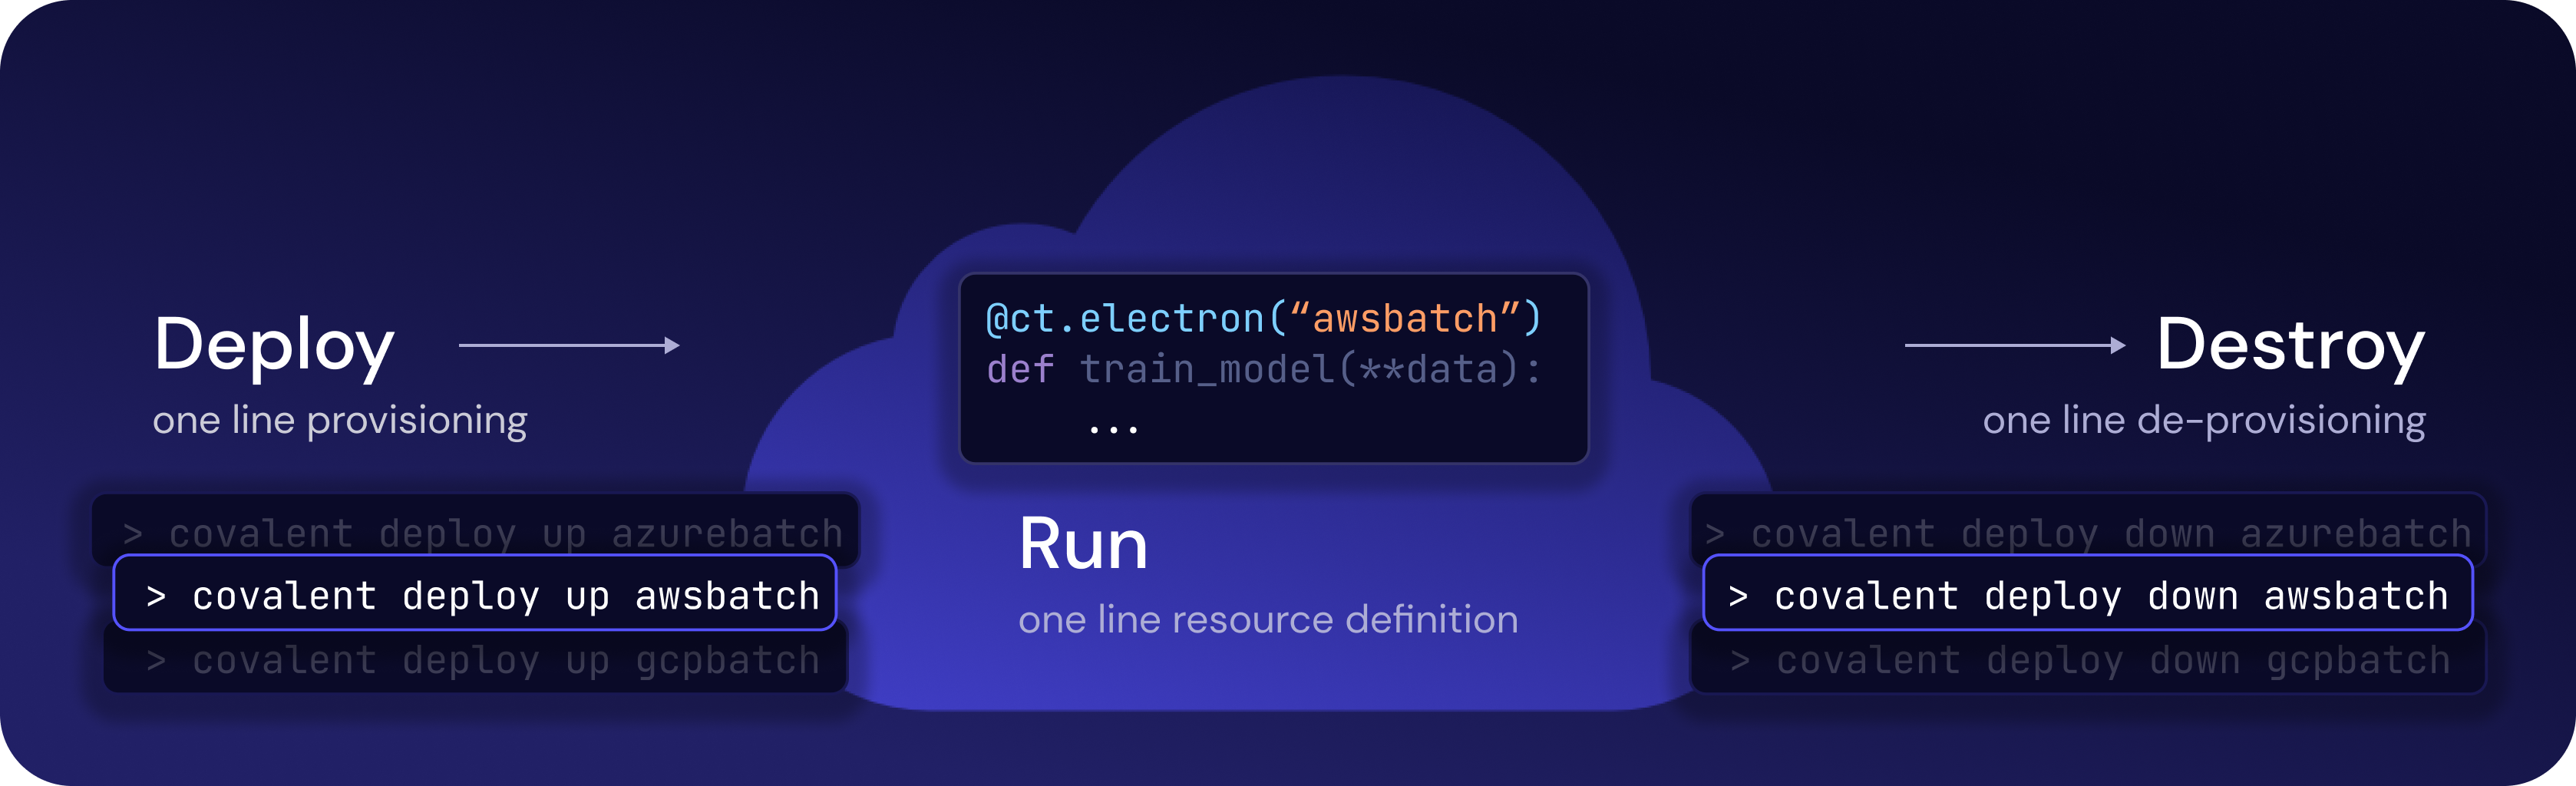
The resource deployment process is as simple as:
- Provisioning the infrastructure with
covalent deploy up <executor_name> <options>. - Executing your workflows. (Covalent will be configured automatically to use the new resources by default. This means that you can directly pass the string representation of the matching executor)
- De-provision the resources with
covalent deploy down <executor_name>when no longer needed. - (Optional) Check deployment status with
covalent deploy status <executor_name>.
Note that the deploy command requires Terraform to process the .tf scripts that ship with each executor plugin. To enable the deploy command for a given executor, simply pip-installed the corresponding executor plugin.
Info
Conda users can install Terraform with conda install -c conda-forge terraform. Alternatively, see the official instructions for other installation methods.
Building upon the steps above, let’s delve into deploying on AWS, GCP, and Azure. Please note that you'll need valid credentials to use these platforms, since Covalent by itself does not grant free access to any cloud services.
For the complete feature set of this command, see:
covalent deploy --help
- AWS
- Google Batch
- Azure Batch
Install Covalent and the AWS Batch executor plugin.
pip install --upgrade covalent covalent-awsbatch-plugin
Next, set up credentials for AWS using environment variables or any other supported authentication methods.
export AWS_ACCESS_KEY_ID="<access_key_id>"
export AWS_SECRET_ACCESS_KEY="<secret_access_key>"
export AWS_SESSION_TOKEN="<session_token>"
To see the full list of deployment options, run the command below.
covalent deploy up awsbatch --help
Any arguments shown by --help can be overridden with custom values upon deployment.
covalent deploy up awsbatch --vcpus=12 --num_gpus=2
Once provisioning (i.e. covalent deploy up awsbatch [options]) is complete, Covalent will utilize the specified configuration by default. Electron executors can be set using the short-form string representation thereafter, as shown below.
import covalent as ct

@ct.electron("awsbatch")  # uses 12 vCPUs, 2 GPUs
def high_compute_function()
    ...
Any defaults can also be modified by using an AWSBatchExecutor instance explicitly:
import covalent as ct
from covalent.executor import AWSBatchExecutor

@ct.electron(AWSBatchExecutor(vcpu=8))  # uses 8 vCPUs, 2 GPUs
def high_compute_function()
    ...
Run the following command to de-provision (a.k.a. “tear down”) AWS Batch infrastructure.
covalent deploy down awsbatch
Install Covalent and the GCP Batch executor plugin.
pip install --upgrade covalent covalent-gcpbatch-plugin
Authentication for this plugin requires the gcloud CLI tool. Be sure to install and initialize gcloud before attempting to deploy. Once this is done, the simplest authentication procedure is via Application Default Credentials. See here for more information.
gcloud auth application-default login
Presently, deploying to GCP Batch also requires Docker on the user’s machine. (We hope to remove this requirement in the near future.)
To see the full list of deployment options, run the command below.
covalent deploy up gcpbatch --help
Any arguments shown by --help can be overridden with custom values upon deployment.
covalent deploy up gcpbatch --vcpus=24
Once provisioning (i.e. covalent deploy up gcpbatch [options]) is complete, Covalent will utilize the specified configuration by default. Electron executors can be set using the short-form string representation thereafter:
import covalent as ct

@ct.electron("gcpbatch")  # uses 24 vCPUs
def high_compute_function()
    ...
Any defaults can also be modified by using an GCPBatchExecutor instance explicitly:
import covalent as ct
from covalent.executor import GCPBatchExecutor

@ct.electron(GCPBatchExecutor(vcpus=12))  # uses 12 vCPUs
def high_compute_function()
    ...
Run the following command to de-provision (a.k.a. “tear down”) GCP Batch infrastructure.
covalent deploy down gcpbatch
Install Covalent and the Azure Batch executor plugin.
pip install --upgrade covalent covalent-azurebatch-plugin
Authentication for this plugin requires the az CLI tool. Be sure to install az and run the following command before deploying:
az login
It is also possible to authenticate using various other supported authentication methods. Presently, deploying to Azure Batch also requires Docker on the user’s machine. (We hope to remove this requirement in the near future.)
To see the full list of deployment options, run the command below.
covalent deploy up azurebatch --help
Any arguments shown by --help can be overridden with custom values upon deployment.
covalent deploy up azurebatch
Once provisioning (i.e. covalent deploy up azurebatch [options]) is complete, Covalent will utilize the specified configuration by default. Electron executors can be set using the short-form string representation thereafter, as shown below.
import covalent as ct

@ct.electron("azurebatch")
def high_compute_function()
    ...
Any defaults can also be modified by using an AzureBatchExecutor instance explicitly:
import covalent as ct
from covalent.executor import AzureBatchExecutor

@ct.electron(AzureBatchExecutor(pool_id="mypool123"))
def high_compute_function()
    ...
Run the following command to de-provision (a.k.a. “tear down”) Azure Batch infrastructure.
covalent deploy down azurebatch
Notes and Caveats
Behaviour
The covalent deploy commands up and down behave exactly like vanilla Terraform with respect to resource creation and destruction.
If up fails or is cancelled before completion, then any successfully created resources will remain live. This also means that reissuing the up will attempt to complete the partial deployment, rather than re-creating any resources that already exist. Conversely, the down command will destroy any resources that are currently live.
Debugging
Covalent should communicate any errors from Terraform back to the user. However, it is nonetheless possible to manipulate the corresponding Terraform state manually, using regular terraform commands. The corresponding state files are found inside the /assets/infra folder of the corresponding executor plugin’s install directory.