Introducing Covalent Blueprints
Covalent blueprints are a collection of composable applications for Covalent, each containing pre-configured environments and executors, together with tasks and/or services designed for a particular purpose. Blueprints provide a high-level interface on top of the Covalent SDK, while preserving the ability to customize settings and compute requirements.
This page features a comprehensive introduction to Covalent blueprints, with a total read time of about 10 minutes. To skip ahead to usage examples, see the Standalone execution and In-workflow execution sections.
Installation
To get started, install the package that contains the blueprints of your choice, e.g. covalent-blueprints-ai.
pip install -U covalent-blueprints-ai
Initializing blueprints
The llama_chatbot blueprint is included in the above package. This blueprint deploys a Llama-like language model (by default 'unsloth/llama-3-8b-Instruct-bnb-4bit') as a backend for a chatbot service.
Import the blueprint’s initializer function to get started. Note that initializing a blueprint simply creates a new instance. It does not execute the blueprint nor create any cloud resources.
from covalent_blueprints_ai import llama_chatbot

# Initialize the llama_chatbot blueprint with default settings.
bp = llama_chatbot()
Default inputs
Every initializer (like llama_chatbot) describes a set of initialization parameters and their default values. See an initializer function’s docstring for this information.
help(llama_chatbot)  # show docstring in Python console
llama_chatbot?  # show docstring in iPython console
We can also inspect a blueprint’s inputs attribute to see the default inputs.
print(bp.inputs.kwargs)
{'model_name': 'unsloth/llama-3-8b-Instruct-bnb-4bit',
 'device_map': 'auto',
 'use_saved_model': True,
 'save_model_to_volume': False,
 'model_kwargs': None}
Documentation for each input parameter is also available through the inputs attribute.
print(bp.inputs.docs)
{'model_name': 'Name of the pretrained LLM. Defaults to "unsloth/llama-3-8b-Instruct-bnb-4bit".',
 'device_map': 'Device map for the pretrained LLM. Defaults to "auto".',
 'use_saved_model': 'Load the saved model from the cloud volume, if available. Defaults to True.',
 'save_model_to_volume': 'Save the pretrained model to the cloud volume, overwriting if a copy already exists. Defaults to False.',
 'model_kwargs': 'Additional keyword arguments for the model.'}
Overriding default inputs
To override a blueprint’s defaults inputs, simply pass one or more of these arguments to the initializer function. Argument values set during blueprint initialization are used as defaults for subsequent executions.
bp = llama_chatbot(device_map='sequential')
print(bp.inputs.kwargs)
{'model_name': 'unsloth/llama-3-8b-Instruct-bnb-4bit',
 'device_map': 'sequential',
 'use_saved_model': True,
 'save_model_to_volume': False,
 'model_kwargs': None}
As we’ll see below, we retain the option to override these defaults during execution, by passing keyword arguments to, e.g., bp.run(device_map='balanced') (during standalone execution) or simply bp(device_map='balanced') (during execution inside a Covalent lattice).
Default compute settings
Printing a blueprint’s executors attribute displays the default compute settings (i.e. the executors) for each task. These settings describe the cloud resources used for execution.
print(bp.executors)
{'chatbot_backend': {'env': 'llama-chatbot@blueprints',
                     'gpu_type': 'l40',
                     'memory': 15360,
                     'num_cpus': 8,
                     'num_gpus': 1,
                     'time_limit': 10800}}
Overriding default compute settings
There are several ways to modify a blueprint’s default executor(s). To illustrate these options, let’s look at another blueprint, LLM LoRA Fine-Tuning and Service Deployment, which features more than one executor.
from covalent_blueprints_ai import lora_fine_tuning

bp = lora_fine_tuning()
print(bp.executors)
{'llm_service': {'env': 'lora-fine-tuning@blueprints',
                 'gpu_type': 'l40',
                 'memory': 49152,
                 'num_cpus': 6,
                 'num_gpus': 1,
                 'time_limit': 10800},
 'peft_fine_tuning': {'env': 'lora-fine-tuning@blueprints',
                      'gpu_type': 'l40',
                      'memory': 49152,
                      'num_cpus': 6,
                      'num_gpus': 1,
                      'time_limit': 10800}}
Each top-level key in the output describes a task or service with an editable executor. For this LoRA fine-tuning and deployment blueprint, we can modify the executor for the fine-tuning task ('peft_fine_tuning') and/or the executor for the service that hosts the final fine-tuned model ('llm_service').
Each executor parameter can be modified individually:
bp.executors['llm_service'].gpu_type = 'a6000'
bp.executors['llm_service'].memory = '12GB'

bp.executors['peft_fine_tuning'].gpu_type = 'a100-80g'
bp.executors['peft_fine_tuning'].num_gpus = 2
bp.executors['peft_fine_tuning'].num_cpus = 12
Alternatively, we can also re-assign the entire executor as follows:
import covalent_cloud as cc

bp.executors['llm_service'] = cc.CloudExecutor(
    gpu_type='a6000',
    memory='12GB',
    num_cpus=6,
    num_gpus=1,
    time_limit='3 hours'
)
TIp
Notice that we omitted the new Cloud Executor’s env parameter. Doing so preserves the original executor’s software environment, which is generally recommended when using Covalent Blueprints.
Generic access to executors
Blueprints that deploy a single service (like llama_chatbot) feature a generic bp.executors.service_executor attribute for modifying the service’s executor. For example, the following are equivalent:
llama_bp = llama_chatbot()

# equivalent
llama_bp.executors['chatbot_backend'].num_cpus = 4
llama_bp.executors.service_executor.num_cpus = 4
Blueprints consisting of a single task and a single service additionally feature a bp.executors.task_executor attribute. For example, the following are also equivalent:
finetune_bp = lora_fine_tuning(use_quantization=False)

# equivalent
finetune_bp.executors['peft_fine_tuning'].num_gpus = 4
finetune_bp.executors.task_executor.num_gpus = 4

# also equivalent
finetune_bp.executors['llm_service'].gpu_type = 'a6000'
finetune_bp.executors.service_executor.gpu_type = 'a6000'
Let’s see how we can modify these settings to run the meta-llama/Meta-Llama-3-70B-Instruct model instead.
Standalone execution
In Covalent, “standalone” execution means using launching a cloud application outside the context of a Covalent workflow . The converse case of in-workflow execution is covered in the next section. Here, we’ll see how to run Covalent blueprints without using other components form the Covalent Cloud SDK.
Example: Serving Llama3 70B for inference
First, import and initialize the blueprint as usual.
from covalent_blueprints_ai import llama_chatbot

# Initialize default version of blueprint.
bp = llama_chatbot()
After this we can (1) save our Hugging Face token required to access meta-llama repos, (2) modify the executor for the chatbot backend and (3) execute the blueprint with a new model_name.
from covalent_blueprints import store_secret

# 1. Save Hugging Face token.
store_secret("HF_TOKEN", "<huggingface-write-token>")

# 2. Swap backend to 2x H100 GPUs with 240 GB of memory.
bp.executors["chatbot_backend"].gpu_type = "h100"
bp.executors["chatbot_backend"].num_gpus = 2
bp.executors["chatbot_backend"].memory = "240GB"

# 3. Execute the blueprint to deploy the chatbot service.
llama_client = bp.run(model_name="meta-llama/Meta-Llama-3-70B-Instruct")
In-workflow execution
Covalent Blueprints are designed to be fully compatible with user-defined Covalent applications. In-workflow execution is useful for parallelizing blueprints, creating interconnected services, or using the outputs of normal Covalent tasks as inputs to a blueprint.
Example: LLM-refined SDXL image generation service
To see how this works, let's create a Covalent lattice that launches three services:
- A hosted LLM, specifically a variant of Microsoft’s Phi-3, using the vLLM Inference Service blueprint
- A realistic image generator service, using the Fast SDXL Image Generator Service blueprint
- A simple interface service that interconnects the two previous services
Let's start by importing the two blueprints that we'll use in this example.
from covalent_blueprints_ai import sdxl, vllm_inference
For image generation, we'll create an instance of the sdxl blueprint.
sdxl_bp = sdxl()  # default settings

print(sdxl_bp.executors)
{'sdxl_backend': {'env': 'sdxl@blueprints',
                  'gpu_type': 'l40',
                  'memory': 49152,
                  'num_cpus': 4,
                  'num_gpus': 1,
                  'time_limit': 10800}}
Next, we'll initialize an instance of the vllm_inference blueprint. Here we'll set the gpu_type to use an A6000 GPU.
# Initialize vLLM blueprint
vllm_bp = vllm_inference()

# Override default executor
vllm_bp.executors.service_executor.memory = "12GB"
vllm_bp.executors.service_executor.gpu_type = "a6000"

print(vllm_bp.executors)
{'vllm_service': {'env': 'vllm-inference@blueprints',
                  'gpu_type': 'a6000',
                  'memory': 12288,
                  'num_cpus': 6,
                  'num_gpus': 1,
                  'time_limit': 10800}}
Here is the model that we'll use with vllm_bp.
MODEL_NAME = "microsoft/Phi-3-mini-4k-instruct"
This model works best with a prompt template like the following. Here we define PHI_TEMPLATE in the global context to use it next code block.
PHI_TEMPLATE = """<|system|>
{system_prompt}<|end|>
<|user|>
{user_prompt}<|end|>
<|assistant|>
"""
Let's create a simple low-compute service that implements an interface to our reviewed-prompt image generation pipeline. This service needs to communicate with both of the other services deployed by the above blueprints. It takes as input a pair of clients with which to do this.
import covalent_cloud as cc

cc.create_env(name="basic-env", wait=True)  # ~2 mins to create first time

basic_executor = cc.CloudExecutor(  # no GPUs here
    env="python310-basic",
    num_cpus=2,
    memory="12GB",
    time_limit="3 hours",
)


@cc.service(executor=basic_executor, name="Interface Service")
def enhanced_prompt_interface(vllm_client, sdxl_client):
    """Service that passes prompts to vLLM and SDXL models."""

    if vllm_client.status != "ACTIVE":
        raise RuntimeError("vLLM model service is not active.")

    if sdxl_client.status != "ACTIVE":
        raise RuntimeError("SDXL model service is not active.")

    return {
        "vllm_client": vllm_client,
        "sdxl_client": sdxl_client,
    }
Next, we add a single API endpoint (POST /generate_image) for generating images based on user prompts reviewed by an LLM.
@enhanced_prompt_interface.endpoint("/generate_image")
def generate_image(
    vllm_client=None,
    sdxl_client=None,
    *,
    prompt="",
    system_prompt="",
    max_tokens=150,
    enhance_prompt=True,
):
    """Generate an image with an auto-augmented generation prompt.

    Kwargs:
        prompt (str): A prompt to be enhanced by the vLLM model.
        system_prompt (str): A system prompt for the vLLM model.
        max_tokens (int): The maximum number of tokens to generate.
        enhance_prompt (bool): Whether to enhance the prompt with vLLM.
    """
    if not prompt:
        prompt = "A beautiful sunset over the ocean."

    if not system_prompt:
        system_prompt = "You are an AI assistant who reviews image generation prompts. " \
                        "Use your knowledge to correct any issues with the raw prompt " \
                        "and provide a new prompt that is clear and concise."

    # Get improved prompt from vLLM model.
    if enhance_prompt:
        new_prompt = vllm_client.generate(
            prompt=PHI_TEMPLATE.format(user_prompt=prompt, system_prompt=system_prompt),
            max_tokens=max_tokens
        ).strip()
    else:
        new_prompt = prompt

    # Generate image from SDXL model.
    image_str = sdxl_client.generate(
        prompt=new_prompt,
        upscale=True,
        strength=0.5,
        scale_factor=1.25,
    )

    return {
        "image_b64": image_str,
        "prompt": prompt,
        "new_prompt": new_prompt,
    }
To wrap it all up, we create a lattice (a.k.a. a Covalent workflow) that sets up our three-service pipeline in Covalent Cloud. Inside this function, we simply call blueprints directly to execute them.
import covalent as ct


@ct.lattice(executor=basic_executor, workflow_executor=basic_executor)
def launch_prompt_refinement(model_name):

    # Run blueprints inside as part of this workflow.
    vllm_client = vllm_bp(model_name=model_name)
    sdxl_client = sdxl_bp()

    # Launch the interface service inside this workflow.
    interface_client = enhanced_prompt_interface(vllm_client, sdxl_client)

    return interface_client, vllm_client, sdxl_client
Having defined the launch_prompt_refinement workflow, we can dispatch it as follows:
lattice_id = cc.dispatch(launch_prompt_refinement)(
    model_name=MODEL_NAME,
)
print(lattice_id)
1275cb6f-4a1a-429f-9e24-1f8ac8cba68d
Note that, because our calls to vllm_bp and sdxl_bp are independent, these blueprints execute and deploy their cloud resources simultaneously.
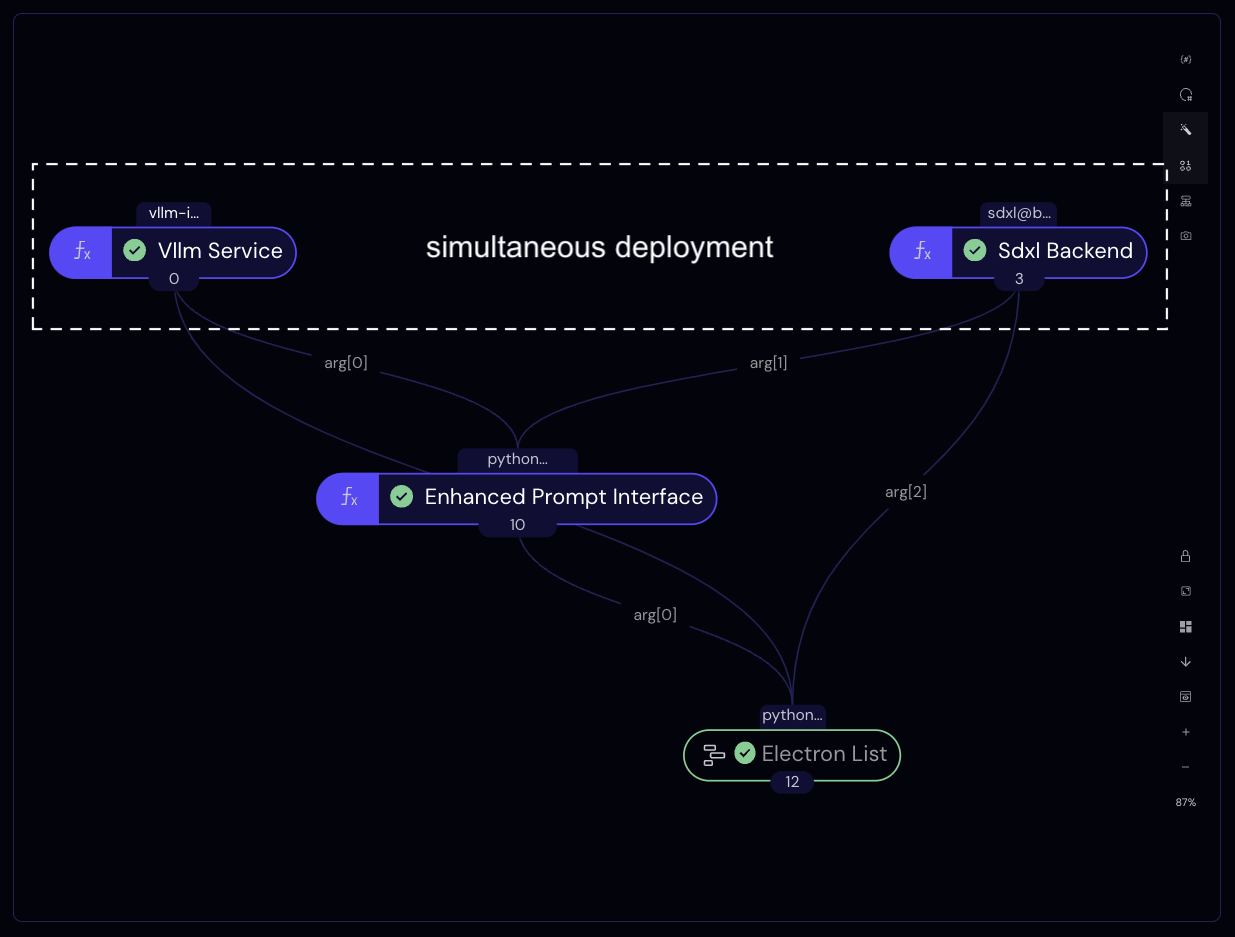 Completed workflow graph as seen in the Covalent UI.
Upon completion, the lattice returns three clients, one for each running service. We we can unpack these as follows to obtain Python objects that communicate with our cloud services.
res = cc.get_result(lattice_id, wait=True)  # async. result retrieval
res.result.load()

interface_client, vllm_client, sdxl_client = res.result.value
Printing any service client will display endpoint docstrings along with other useful information.
print(interface_client)
╭──────────────────────────────── Deployment Information ────────────────────────────────╮
│  Name          Interface Service                                                       │
│  Description   Service that passes prompts to vLLM and SDXL models.                    │
│  Function ID   66d912b802383c4201ed2fb8                                                │
│  Address       https://fn-a.prod.covalent.xyz/66d912b802383c4201ed2fb8                 │
│  Status        ACTIVE                                                                  │
│  Auth Enabled  Yes                                                                     │
╰────────────────────────────────────────────────────────────────────────────────────────╯
╭────────────────────────────────────── Endpoints ───────────────────────────────────────╮
│  Route        POST /generate_image                                                     │
│  Streaming    No                                                                       │
│  Description  Generate an image with an auto-augmented generation prompt.              │
│                                                                                        │
│                   Kwargs:                                                              │
│                       prompt (str): A prompt to be enhanced by the vLLM model.         │
│                       max_tokens (int): The maximum number of tokens to generate.      │
│                       enhance_prompt (bool): Whether to enhance the prompt with vLLM.  │
│                                                                                        │
╰────────────────────────────────────────────────────────────────────────────────────────╯
Authorization token:
bJWgma0KhW5GHBG9XTSCRdGOwhzIfRgqhaR9KoFYRD4VGA3S3wqYFHw7MwVp6cA22cwD79608WBrNGemYdUjYw
Let’s send a sample request to the interface service using the interface_client returned by the workflow. Here we’ll use a system prompt that asks the LLM to enhance the original prompt such that the generated image incorporates themes from Lord of The Rings.
LOTR_SYSTEM_PROMPT = "You are an AI assistant who improves image generation prompts. " \
    "Add additional details to the prompts to rephrase them in a " \
    "manner that transposes the prompt into the setting of Lord of The Rings. " \
    "Preserve the subject, action, or main description of the original prompt. " \
    "Respond only with the new prompt, nothing else." \
    "Your entire response must be ready to use as a new image generation prompt."


result = interface_client.generate_image(
    prompt="A cabin in the woods",
    system_prompt=LOTR_SYSTEM_PROMPT,
)

print("ORIGINAL PROMPT:")
print(result["prompt"])
print("\nENHANCED PROMPT:")
print(result["new_prompt"])
ORIGINAL PROMPT:
A cabin in the woods.

ENHANCED PROMPT:
A rustic, cozy wooden cabin nestled among the thick, gnarled trees of the enchanted forest, with smoke gently rising from a chimney and ivy creeping up the ancient stone walls. Night has fallen, and the soft glow of lanterns flickers through the large, mullioned windows. In the deep secretive of night, the faintest hint of a bedtime campfire tale lures neighbors from their surrounding clusters of smoke signals. The air smells faintly of pine, and the distant bark of a sentry dog echoing through the silent woods is faintly audible. There are no modern conveniences visible, only that echoes of a craft
import base64
import io
from PIL import Image


def decode_and_display_image(img_b64_str):
    """Helper function to display generated images in a Jupyter notebook."""
    buffer = io.BytesIO(base64.b64decode(img_b64_str))
    img = Image.open(buffer)
    return img

# Display inside Jupyter notebook.
decode_and_display_image(result["image_b64"])
 Passing in the
 enhance_prompt=False option, we can also retry without the enhancement step, for comparison. Let’s see the image that the non-enhanced prompt produces.
result = interface_client.generate_image(
    prompt="A cabin in the woods.",
    enhance_prompt=False,  # disable the LLM review step
)
# Display inside notebook.
decode_and_display_image(result["image_b64"])

It's clear that the previous image more closely adheres to a typical “fantasy” aesthetic, whereas this one resembles a more realistic setting. Of course, by passing a different system prompt in this example, we can easily modify the vLLM service’s role in this pipeline.
Once finished, services can be torn down by calling the teardown() method on each client, or by initiating teardowns in the Covalent UI.
interface_client.teardown()
vllm_client.teardown()
sdxl_client.teardown()
'Teardown initiated asynchronously.'
If a manual teardown is not performed, then services are cleaned up automatically according to each executor's time_limit.